
There’s no doubt about it, dogs are indeed man’s best friend.
In fact, to most people, dogs are more than friends; they are part of the family.
Because of this, dog lovers see to it that their dogs are always given the best treatment. Hence, the rise of establishments offering luxurious services for pets, like pet hospitals, spas, and even doggy themed hotels.
However, even with this level of luxury there are dog grooming chores that an owner must, sometimes, do themselves.
This can be the case when it comes to trimming your pets nails.
Just like human finger nails, dog nails grow quite fast and owners who have carried out the process many times before will know there is a particular art to trimming a dog’s nails.If you’re reading this thinking to yourself do you really have trim your dog’s nails? Quick word of warning – let your dog’s claws become too long, and you run the risk of getting caught by their claws and either you or your dog being hurt.
Not only this but you also run the risk of exposing your dog to certain infections, espeically if they become so long they begin to break.
However, the reason we said there is an art to cutting your dog’s nails is because if you cut your dog’s claws too short, they’re likely to bleed.
The following post offers ome remedies in the event of dog nail bleeding and how you can prevent the dilemma in the first place.
Why should I trim my dog’s nails?
Dog nail trimming is an essential part of dog grooming.
Aside from the reasons above, long nails can cause injury and pain to your dog.
Long nails are likely to hurt your dog when they stand up and will also affect the way they walk or run.
Long nails also tend to curl into the skin which can be very painful for athe dog.
The frequency of nail trimming differs for every dog. Dogs that play on softer surfaces may need to have their nails cut more regularly.
Softer surfaces like carpet, dirt paths, and grass, do not provide the necessary friction to file down the nails naturally.
How do I trim my dog’s nails?
Most pets will be very uneasy and may act out while their nails are being trimmed.
Some dogs may even yelp, squirm and cry during the process.
Veterinarians recommend that owners should start trimming the nails of their dog while it is still a puppy to acclimatize them to the process. In doing so, you lessen their fear of it and make it much easier for the task to be carried out.
Here’s how to do so:
First, establish a routine with your dog.
Some dogs will obligingly lie down on the table or sit down on your lap to have their nails clipped while some will put up a fight.
If this is the case with your dog some form of restraint may need to applied, just enough to keep them still.
To do this you can lay your dog on top of the table and drape your arms over the dog’s body. This position works like a hug and also makes your beloved pet feel much safer.
Another option is to lay your pet down on their side. Place your less dominant hand and upper body on your dog to keep them from getting up. You can then trim your dog’s claws using your other hand.
If you have someone to help you, allow them to hold your pet instead, so you have full use of both your hands. This should make the process much quicker and easier to manage.
As for the cutting instrument, you have two options when it comes to dog clippers: the scissors-type and the guillotine type.
The scissors clipper, as its name suggests, it works much like a traditional pair of scissors.
This style is considered best for dogs with thicker and bigger nails.
A guillotine clipper, on the other hand, has a stationary ring and a blade right at its tip. The nail is placed into the opening, and the blade used to cut it.
This type of clipper is made for dogs with thin to medium thick nails.
Aside from the cutting tools above, some dog owners chose to use a Dremel instead. A Dremel is an electronic tool which works much like a nail file. It sands down the nails using a rotating grit.
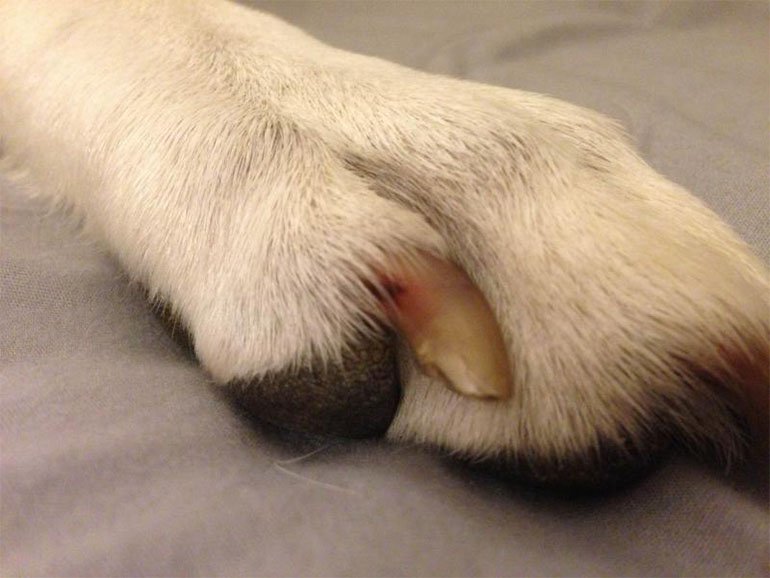
TIP: Cut the claw around 2 millimeters from the quick.
Note the difference in the color of the nail and the quick.
For dogs with light colored nails, the quick is rather easy to distinguish from the nail. The quick will look lighter and more pinkish than the rest of the nail.
If your dog seems to be agitated, stop the trimming and resume after an hour or so. This is to avoid stressing them out.
When cutting dark-colored nails, it is better only to cut the sharp-pointed tip part.
The broader parts of the nail should be cut with caution as these may already be a part of the quick. With each cut, take a look at the cross-section of the nail.
As you get closer to the quick, the center will turn into a light gray and fleshy white color. If you have any doubts, stop trimming and turn to a professional instead.
What happens if I cut my dog’s nails too short?
A dog’s nail anatomy is a bit more complicated than human nails.
A dog’s nail comprises an outer hard shell, and a soft cuticle made up of blood vessels and nerves. The cuticle is also known as the “quick” which was explored quickly in the section above.
You will know you have cut into the quick if the nail starts to bleed or your dog yelps in pain.
If nail bleeding does not accompany the sudden crying or yelping of the dog, this could mean that the cut was made close to the quick.
Five ways to treat dog’s bleeding nails
When you cut your dog’s nails a little too short, do not panic.
Your dog will feel your fear and panic. Be as calm as possible and do perform these remedies in case of dog nail bleeding:
- Styptic powder or pencil
Styptic is an antihemorrhagic agent that stops bleeding by contracting the tissues and sealing the injured blood vessels. It comes in two forms: pencil and powder.
Styptic powder usually contains Benzocaine, a topical anesthetic that will ease your dog’s pain. Aside from this, it will also help prevent infection.
Before applying styptic, wipe the blood from the injury using a tissue or wet towel.
To use styptic powder, dip a moistened q-tip or swab into the powder.
Apply this on to the bleeding nails using a moderate pressure to avoid hurting your dog. Do this for a few minutes or until the bleeding stops.
If your dog is calm enough, you can directly dip your dog’s paws into the powder to stop the bleeding instantly
As for styptic pencils, there is no longer a need to use a q-tip or swab.
Just dip the pencil in water to moisten it and then it’s ready for use.
NOTE: Styptic pencils usually contain silver nitrate which may leave stains on the skin or furniture.
- Baking Soda, Flour or Cornstarch
If you do not have any styptic powder or pencil on hand, you can make use of baking soda paste. To make a baking soda paste, just mix baking soda with water until you create a thick paste.
Use an applicator such as a q-tip or swab to apply the paste on to your dog’s injured nails.
Leave the mixture on for a few minutes or until the bleeding stops.
If you do not have baking soda, you can alternatively use flour or cornstarch.
The baking soda, flour, and cornstarch mix do not work as fast as the styptic powder or pencil does.
It takes it a few more minutes to fully take effect, but it does serve the purpose of being an adequate first aid remedy.
- Bar of Soap
Another home remedy for dog nail bleeding is using a bar of soap.
Note, however, that the bar of soap must be fragrance-free and of mild formula. Soaps with harsh chemicals will only make matters worse for you and your dog.
To do this, directly place your dog’s paw on top of the bar of soap for a few minutes or until the bleeding stops.
You can also swipe or drag your dog’s paw across the soap making sure it touches the injured spots.
If a clot or plug doesn’t form, repeat the process, ensuring that there is enough pressure between the dog’s paws and the bar of soap.
- Potassium Permanganate
Potassium Permanganate is a medication typically used for treating dermatitis and for cleaning wounds.
It is considered as a strong oxidizing agent that quickly dissolves in water resulting into a purple or pink solution. It usually comes in the form of bright purple crystals.
To use potassium permanganate to stop dog nail bleeding, start by dipping a q-tip or swab into the water.
After moistening the swab, dip it into the potassium permanganate, making sure that the crystals latch onto it.
Press the applicator to the bleeding area and hold it there for a few seconds or until the bleeding stops. If the bleeding continues, repeat the process and keep the swab in place for at least five minutes.
- Bandage
If the aforementioned first aid items are not present in your house, use a bandage and an ice pack to stop the bleeding.
Carefully wrap your dog’s paw with the bandage while making sure that just the right amount of pressure is applied on to it.
It is also a good idea to first put a sock over the injury first before putting the bandage.
After doing this, make sure that your dog does not put too much pressure on the injured paw. Pressure may cause the paw to bleed again.
Check the nails for any signs of infection after a few days.
If the bleeding does not stop within 20 to 30 minutes or if the injury gets infected, contact your veterinarian immediately. Any swelling or continuous bleeding or limping are tell-tale signs that the wound might be infected.
Clipping your dog’s nails can be a tricky business. However, it is an vital part of dog grooming.
The next time you trim your dog’s nails, take note of the tips provided here.
By learning how to do this yourself, not only will you be able to save money, you’ll also create a bonding experience for you and your beloved pet.
Just remember to be careful and should something happen, apply one of the first aid remedies we have provided here.
Other Guides Dog Owners May Find Useful: